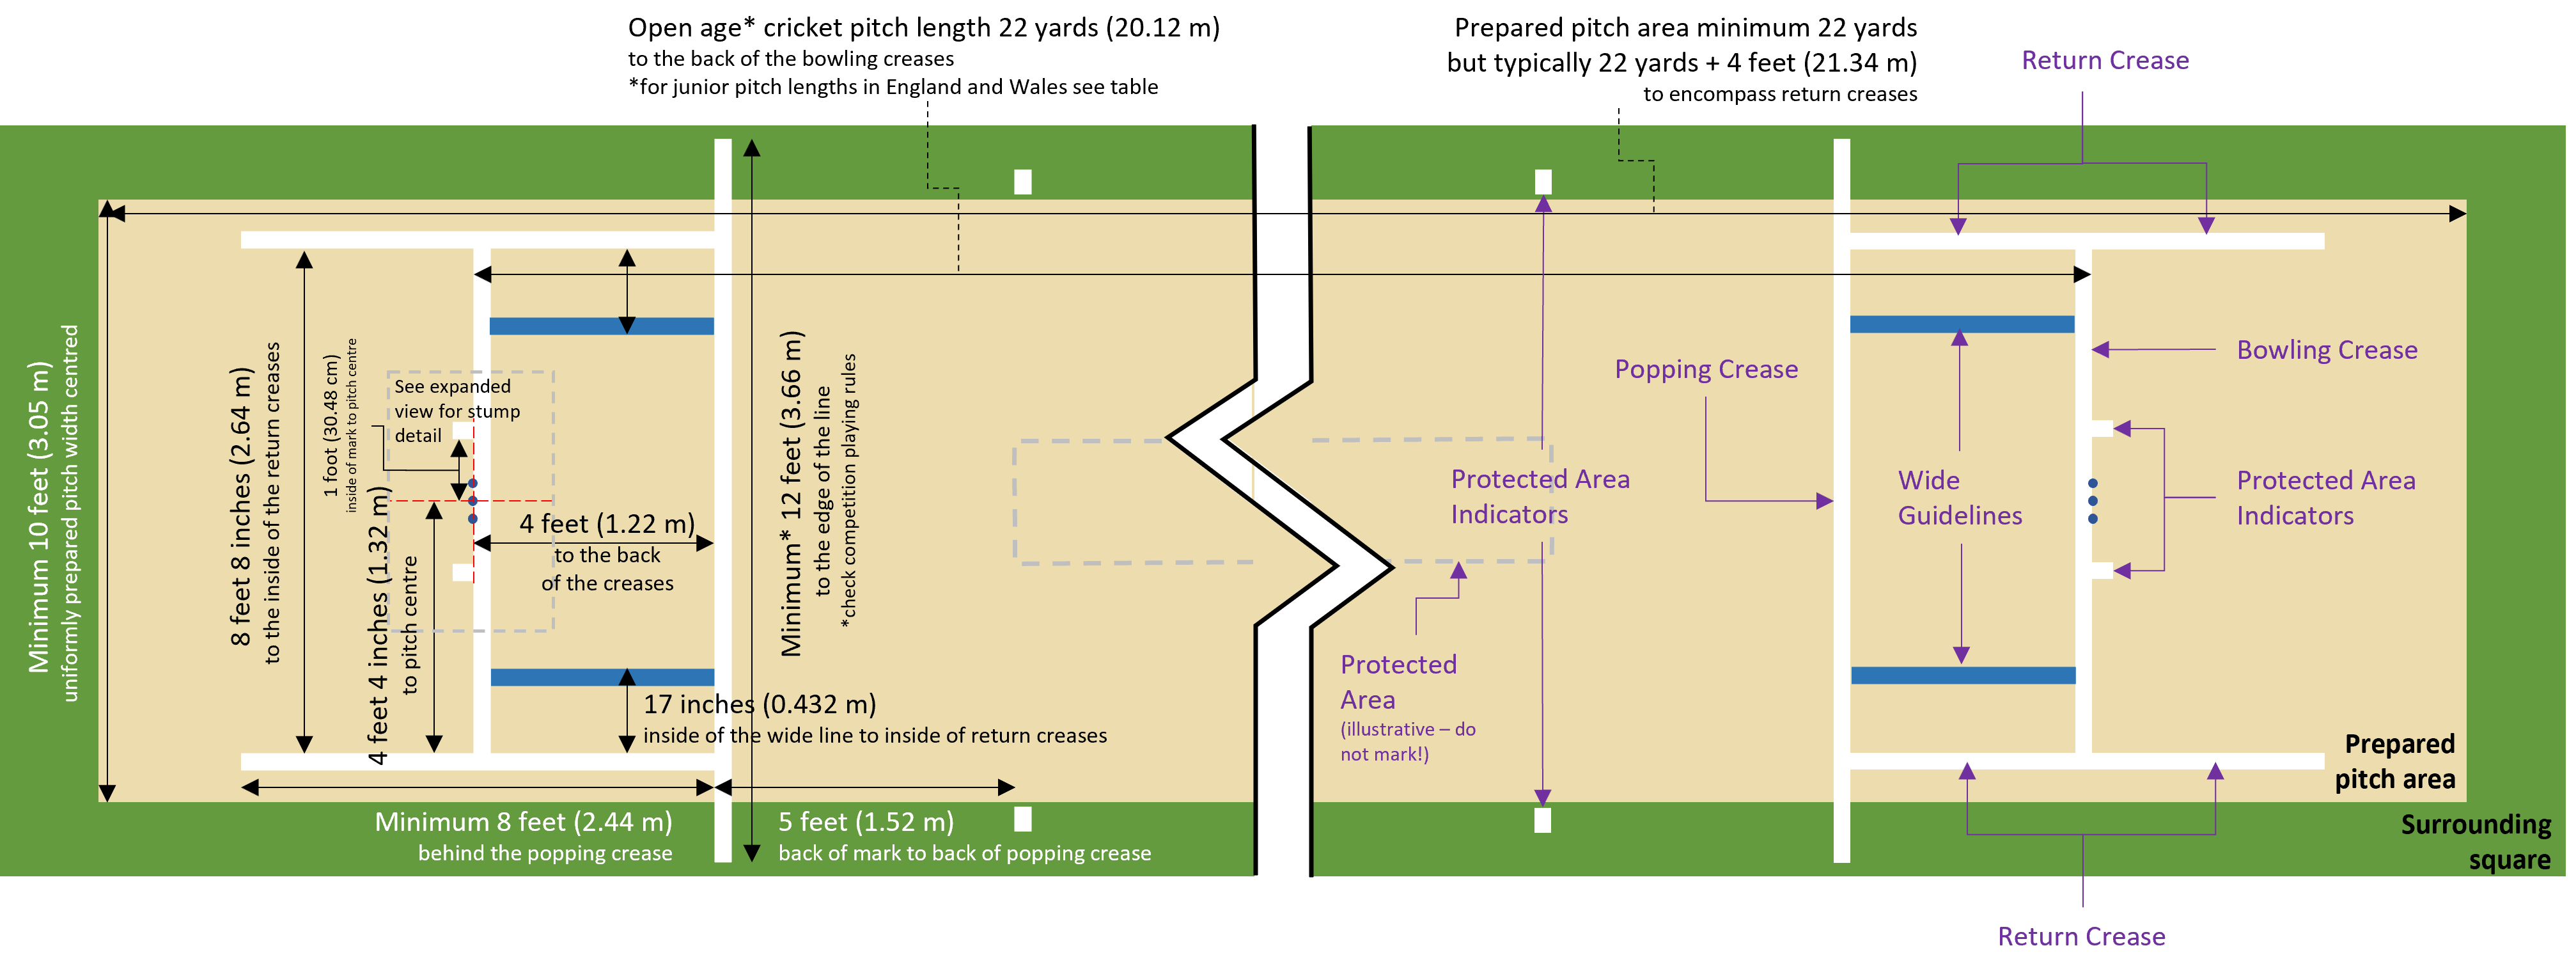
Marking the pitch sets the dimensions for the game and gives the players and umpires guidelines for decision making during the game. All markings must comply with the laws of the game and be clearly seen from both umpire positions. This is really important for the enjoyment of the game (incorrect markings can cause trouble for bowlers, umpires, and runouts).
The relevant Laws of Cricket are:
- Law 6 ‘The Pitch’ - https://www.lords.org/mcc/the-laws-of-cricket/the-pitch
- Law 7 ‘The Creases’ - https://www.lords.org/mcc/the-laws-of-cricket/the-creases
- Law 41 'Unfair Play' - Unfair play Law | MCC (lords.org)
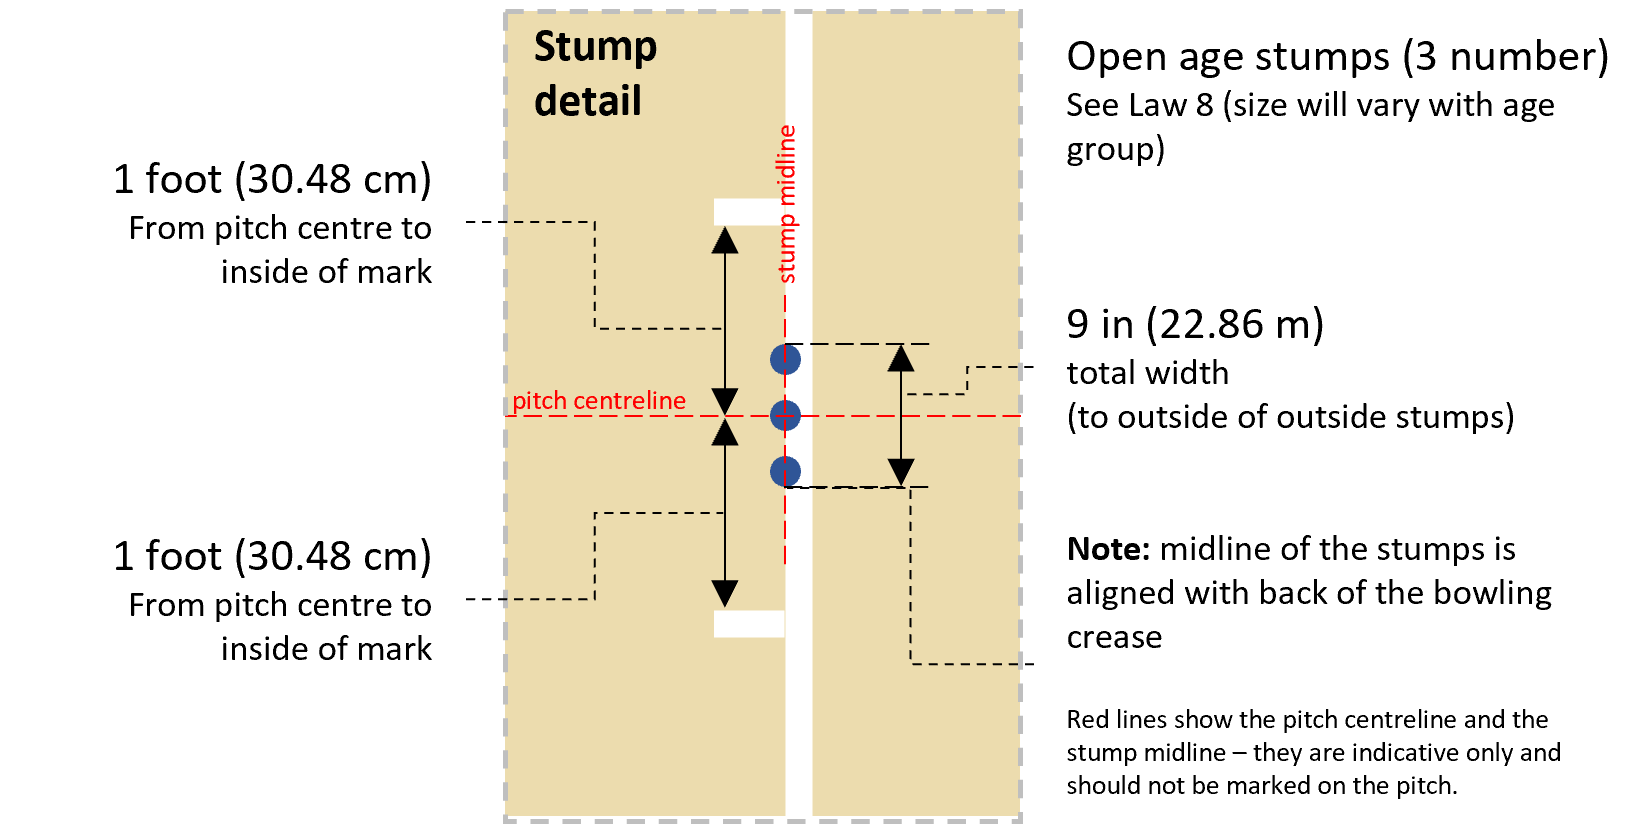
Pitch markings determine the position of the stumps, the length of the pitch (depending on age group) and other essential marks for playing the game of cricket.
Note that in England and Wales, the ECB recommends different pitch lengths (not widths or crease markings) for some junior age groups - for more information see the ECB Guide to Junior Pitch lengths.
The Pitch is marked out prior to the game, usually the day before or on the morning of the match and depending on the amount of grounds management, worn lines are re-marked between a game’s innings and at the start of each day.
The length of the pitches should be set at the start of the season when the square is set out in terms of being square and pitches are located. Squaring the Square This can be corrected in pitch line marking, however.
Correct pitch marking is shown in the following diagrams:
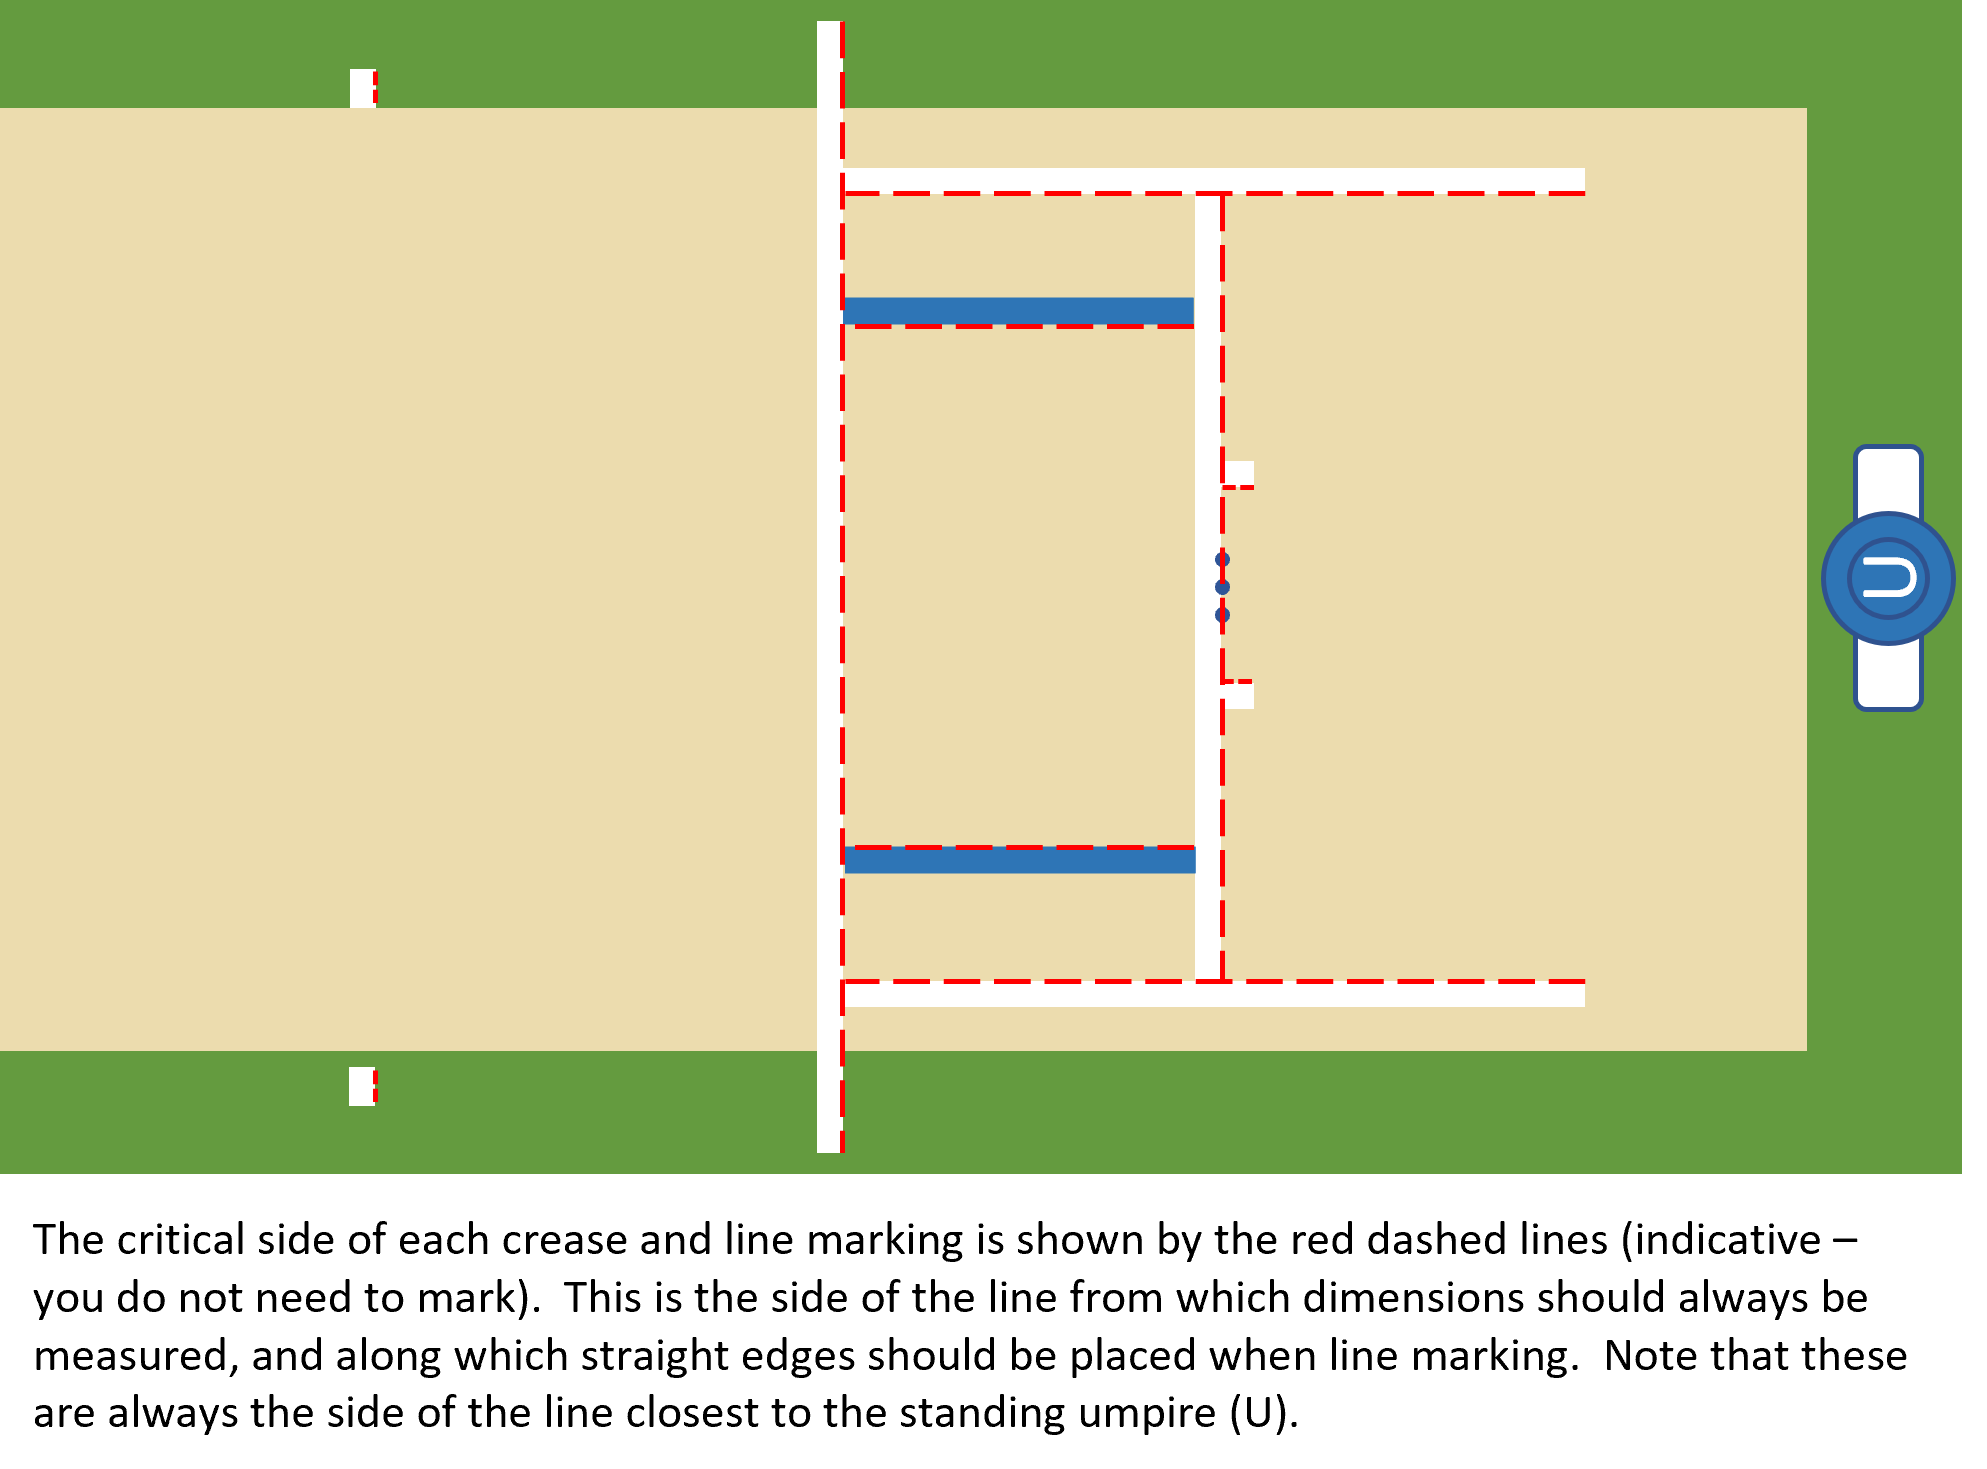
Whilst the pitch markings are set out in the Laws of Cricket, often the detail is in which side of the line is the measurement taken (because the line has a thickness itself). The easiest way to interpret this is to remember that it is the side of the line nearest the standing umpire that is the critical side of the line. This is shown in the following diagram:
Note that all line marking materials must be legal to use on sports pitches and must not contain any oils (to avoid damaging the grass) or prohibited chemicals. The best application method is to use a 12.5 mm (½ in) paint brush with line marking paint in a suitable container. Spray line marking paints can be used but it can be difficult to maintain line thickness.
The laws of the game require the creases to be marked in white, although it can be helpful to use alternative colours for junior pitches in non-turf pitches. Wide guidelines are often marked in an alternative colour to avoid confusion with the creases and to make them more visible from the other end of the pitch, particularly when the sun is behind them (normally blue – but check your league playing conditions) – note that wide guidelines are not required in every division of every league – you must check your league playing conditions/ground rules.
The thickness of lines is not stipulated in the laws of cricket (because it is only one side of the line that is critical). In the UK, the customary practice is to use thinner lines of approximately 12.5 to 19 mm in (½ to ¾ inch), but in other countries these lines are often wider.
As well as maintaining the correct length, width and spacing of lines, it is important that they are straight and perpendicular to each other as required.
Initial marking out can be carried out using string-lines and a straight edge, or a fixed marking frame and a straight edge. Note that with a marking frame, careful alignment and control of line thickness is required to mark the Bowling Crease, because this is the only line where the critical side of the line is not against the marking frame. Also, make sure that you mark the correct side of any Wide Lines if using (refer to the diagrams on this page for the right side of each line).
When using a marking frame it can be helpful to set a ‘centreline’ string from middle stump to middle stump. If you have squared your square correctly at the beginning of the season this will help to make sure your creases are correctly aligned to each other and that pitches remain parallel across the square.
If you are using a straight edge – check that it remains straight over time. Sometimes wooden straight edges are used, but these can wear or bow over time, particularly if not stored correctly – so keep checking (on a well finished building floor or wall for example). Aluminium can provide the best combination of stiffness and lightness for a durable straight edge. It does not have to be 12 feet (the longest crease) long – but it does need to be long enough to maintain straight and parallel edges as it is moved along the crease line or string. A minimum length of 6 feet (1.84 m) is generally suitable, but if you are able to go to 8 or even 10 ft then it will make it easier.
Whether you are using a marking frame or a straight edge, always wipe down the edge of the tool after use to prevent inadvertent marking of the pitch by paint as the tool is moved and to prevent accumulation of dried paint on the tool which affects presentation, accuracy and thickness of the line.
Where possible – sweep and re-mark lines at the start of every day of play and in-between innings in full accordance with Law 9 and league playing conditions.
When re-marking used pitches, brush-out any loose material Law 9.2 and overmark using a straight edge aligned with the critical side of the line.
If marking directly on to soil it can be helpful to lightly moisten the area to be painted (only that area and do not over-water).


 Tweet
Tweet